Discovering mold and fungal growth on floor joists and the subfloor resting on them can be a worrying find. Many are aware that inhalation of mold spores can be hazardous to the health of humans and animals, and the environment that it grows in can indicate issues such as high moisture levels which can lead to rot.
So, what causes mold on floor joists in the first place, what is the most effective way to remove it yourself and how can you prevent this from occurring again in the future?
In this article, we will be answering all these questions and more, so, for all you need to know about mold on floor joists and subfloors, keep reading.
What causes mold on floor joists?
Mold will grow wherever its needs are met, and despite being a complex organism the requirements for its growth are very simple. All fungi (of which a mold is a form), need to thrive are a source of moisture, nutrients, and oxygen. A temperature range between 60-80 degrees Fahrenheit will also speed up the rate at which it can grow.
Now that we know what it needs, let’s dive in a little deeper to see how your property may be providing these elements.
Hydration
Excess moisture is the number one cause of rot, mold, and mildew growth in floor joists and subflooring. As soon as humidity levels reach greater than 55%, the moisture can begin to condense on cooler surfaces, including Floor joists which fungi can use as a source of hydration.
Common causes of high humidity within basements or underfloors include:
Leaks
Broken pipes and guttering or issues within foundations and brickwork can cause ingress of moisture to crawl spaces or basements. This moisture can then evaporate, increasing the overall humidity within the space which then condensates and pools on other surfaces, causing rot and acting as a source of moisture for mold.
Lack of ventilation/airflow
With adequate airflow, stale, moisture-laden air is forced out of a room and is replaced with dry, fresh air. Without airflow, the stale air grows in its moisture levels, allowing the pooling and condensing of water droplets onto surfaces.
As floor joists and subfloors tend to be located within the roof cavity of basements or within crawl spaces, adequate airflow is often not provided, and with new building regulations stipulating that buildings must be as air-tight as possible to reduce heating costs and become more environmentally friendly, lack of airflow is becoming a more common cause of fungal growth.
High humidity climates
Not all high moisture levels in a property are caused by bathing and cooking etc., as many states are subject to high humidity levels year round. For example, Florida has recorded humidity levels reaching 85% and greater, and as you may recall, humidity levels greater than 55% are all that is required for mold and mildew to thrive.
All that is needed in states such as these with high year-round humidity, is a source of nutrients and oxygen, and mold has everything it needs.
Flood damage
Flood damage that is not quickly or properly resolved will soak into wood, brickwork, and other materials, causing damage by the way of rot, and increasing humidity levels as it evaporates. The high-moisture environment this creates will again allow mold and mildew to thrive.
Nutrients
Without nutrients, fungi cannot grow, even if moisture is plentiful. You may be wondering what fungi could possibly consume, and the answer is simple. Mold and mildew feed off of shed skin cells and organic materials found within dust.
Shed skin cells from both humans and animals provide all the fats, minerals, and proteins that fungi require, with additional nutrients coming from other organic materials such as dried, dead plant matter.
Types of mold on floor joists
There are many types of fungi that can grow on floor joists and subfloors, but several grow more commonly within properties and are often reported growing under the conditions described above. These strains include Aspergillus, Penicillium, Stachybotrys Chartarum, Trichoderma, and Cladosporium.
Without proper testing, it can be very difficult to tell which strain you are dealing with, however, as we will explain later, all mold needs to be removed as soon as it is discovered and the root cause of its growth corrected, as all strains have the ability to damage building materials as well as cause health hazards to humans and animals.
If you would like to know which strain you may be dealing with, you can look to see if any particular traits are present in the growth, as it may help you determine what is growing. It is important to note that before getting too close to fungal growth for inspection, protective gear should be worn for your safety, including a breathing mask, rubber gloves, and goggles.
Some of the common traits of the strains mentioned above are as follows:
Aspergillus – Grows in darker colors such as green, brown, and black depending on environmental factors. It is often seen with a powdery or fluffy texture becoming more velvety as it matures.
Penicillium – This is most often seen growing in brighter colors that can include, green, blue-green, gray-green, or even orange and brilliant turquoise, but again, environmental factors play a large part in this. Its texture is often reported as being velvet-like.
Stachybotrys Chartarum – This strain is true “black mold” and unsurprisingly grows in very dark shades and hues including dark-brown, very dark greens, and of course black. Whilst the fungi is dry, it has a shiny appearance, and if wet, takes on a more slimy texture.
Trichoderma – Typically grows in shades of green, although it can also appear in yellow and brown hues. It is commonly found growing with a cotton-like or wooly texture.
Cladosporium – Often grows in several shades, including browns, greens, gray, and black, and has a fuzzy or suede-like appearance, however, it can also be seen with a more velvet-like texture.
Sapstain fungus
Salstain fungi can be seen growing on untreated, freshly cut timber of softwood species such as pine and spruce. It often comes in shades of blue and is frequently referred to as “blue stain fungi” as a result of its distinctive appearance.
The good news is that sapstain fungi occur infrequently in timber purchased from reputable timber yards, as it is treated with chemicals to prevent its growth. It also very rarely denatures the wood and does not reduce the integrity of the material. It only lowers the value of the material due to it becoming less aesthetically pleasing.
White and brown rot
Both white and brown rot are forms of fungi that can affect the timber in either floor joists or subflooring. White rot primarily breaks down lignin and cellulose, two of the major components of wood, thereby weakening it, whereas brown rot (which is slower acting), breaks down cellulose, but not lignin.
Either way, the fungi that cause both white and brown rot types need to be removed and their cause dealt with as soon as it is first spotted to reduce the potential damage it can cause to the timber.
Surface mold and mildew
Superficial growth of fungi on floor joists or subfloor structures can be easily removed and often cause little damage to the underlying timber.
In many cases, newly formed growth after flood damage or water ingress of another sort can lead to rapidly growing mold and mildew. If caught quickly, the growth will only affect the surface of the timber and will not have time to affect deeper parts of the wood.
If left for a sufficient time, however, mold growth can begin to break down the material it is growing on, causing structural damage that may require extensive and costly repairs.
Are they dangerous?
Yes, any type of mold or mildew has the potential to be hazardous to both humans and animals. Even strains that are not considered to be “toxic”, can still pose a threat to people with allergies or suppressed immune systems, and so should be removed as soon as they are discovered.
The most common symptoms of exposure to mold spores are as follows:
- Breathing difficulties
- Coughing
- Chest tightness
- Runny or congested nose
- Watery eyes
- Sneezing
- Skin irritation
The severity of symptoms felt will depend heavily on the person exposed to the spores, as many otherwise healthy Individuals may only suffer mild symptoms, with a minority having the potential to experience more severe symptoms that in rare cases may even require hospitalization.
What are some of the signs of mold on floor joists?
Discovering fungal growth on floor joists can be difficult due to their location and positioning, this is even more the case in crawl spaces where accessibility can be an issue.
One of the first symptoms of fungal growth on either floor joists or within sub-flooring is a musty odor that is often compared to old socks or a damp basement.
Discoloration, warping, or sagging of the timber is a further warning sign that excessive moisture levels may be present within the materials, which can in turn become a breeding ground for fungi.
Of course, discovering patches of fungal growth is the most obvious sign of an infestation, although it can take considerable time for this to occur, and your sense of smell may be your best indicator of fungal growth.
How to assess the damage
As you will be required to get fairly close to the area affected by growth, it is important that you take your safety into consideration. Before attempting to inspect any damage fungi may have caused, you should wear protective equipment such as a breathing mask, goggles, and rubber gloves to avoid coming into contact with either the mold or its spores.
Once you have your protective gear on, begin a structural assessment of the affected timber. Look for any signs of rot, decay, or any signal that the integrity of the material has been compromised in any way.
If you discover that significant structural damage has been caused, it is our recommendation that you consult a structural engineer for further analysis and recommendations.
How to remove mold from floor joists
Superficial fungal growth can be easily removed without the need for professional equipment or expertise. However, before beginning treatment, you must discover and treat the root cause of growth, if high moisture levels (for example), are not dealt with, the mold will quickly return.
Only once moisture levels are back down to an acceptable level and any broken or leaking pipes are fixed should you attempt to remove the fungi, but once this has been achieved, you are good to get started.
Before you begin to treat the growth, ensure you are wearing the correct protective equipment outlined above.
In order to kill and remove mold from floor joists and sub-flooring, use the following steps.
Step 1. Using a Hepa-filtered vacuum, remove as much of the visible mold as possible. This will help to prevent spores from being released and potentially worsening the issue whilst you remove the growth.
Step 2. Make a solution of one part white distilled vinegar to one part water in a large bucket. If using a commercial mold removal liquid, prepare it as instructed on the packaging.
Step 3. Apply the vinegar solution to the affected area and allow it to work for a minimum of 30 minutes. If using the commercial mold killer, use it as directed on the packaging.
Step 4. Dip a soft bristled brush into the vinegar solution, and gently scrub at the growth until it comes away from the timber. Be careful not to mix cleaning solutions with any other liquids unless it is safe to do so, always check the product details to make sure there is no potential for reactions with other chemicals.
Step 5. If the affected materials (such as insulation) will not be able to be cleaned and dried adequately, dispose of these carefully and replace them as needed.
Step 6. If the growth has been active for some time, it may have either stained the timber or begun to damage it. If this damage is only surface level, the wood can be sanded back to remove the staining or damage.
Step 7. Once the treated timber has been left to dry fully, apply an anti-mold or anti-microbial solution. This will help to prevent any further growth, but remember this will only help if the root cause of the original growth has been resolved.
Step 8. Use dehumidifiers, open windows, and allow as much airflow into the basement or crawl space as possible to assist the drying process.
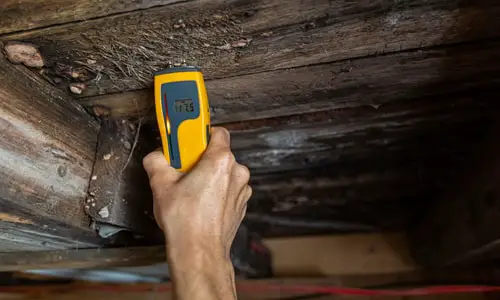
After using these steps, it is important to monitor the humidity levels within the crawl space or subfloor. To keep a close eye on overall humidity levels within your property, you may consider purchasing a hygrometer. These alarm clock-sized units will continuously measure the moisture within the air and clearly display it as a percentage on the screen. As soon as it reaches 55% or greater, humidity levels are high enough for mold to begin growing once more, and airflow should be increased.
What about floor joists in crawl spaces?
Removing the growth of mold, mildew and other fungi from the floor joists within a crawl space can be difficult due to access and ventilation limitations, however, if after inspection the growth appears to be superficial only, and access is achievable, it can be removed.
After wearing the appropriate safety equipment (including eye goggles, a breathing mask, and rubber gloves), use the following steps.
Step 1. Just as with any other fungal infestation, the root cause of its growth needs to be discovered and addressed before attempting to kill or remove any fresh growth. Once this has been completed, you can move on to removing newly developed patches.
Step 2. Using a Hepa-filtered vacuum, remove as much visible mold as possible.
Step 3. Create a solution of one part white distilled vinegar to one part water, or for more established growth, use the vinegar undiluted.
Step 4. Dip a sponge into the solution and wipe it over the affected area. You need to make sure there is enough solution on the sponge to wet the area without saturating it.
Step 5. Leave the solution to work for at least thirty minutes to allow the acid in the vinegar to break the mold down.
Step 6. Use a soft-bristled brush to gently brush away the now-dead mold. If required, you can use warm water and detergent, or more of the vinegar solution.
Step 7. Use a clean and dry cloth or brush to wipe away any mold residue and clean the area fully.
Step 8. Allow the area to completely dry, then, apply a coating of anti-fungal or anti-microbial solution to the affected areas to help in preventing further occurrence.
What to spray on mold on floor joists
Luckily, there are a number of solutions and products that you can spray on subfloor or crawl space floor joists in order to kill mold. This can be especially helpful in areas that are difficult to reach and treat with other methods.
The following is a list of products and solutions that you can spray on joists to kill mold.
White vinegar
The acidity in vinegar is highly effective at killing mold, is environmentally friendly, and is very cheap to purchase. For superficial mold, mix one cup of distilled white vinegar with one cup of water into a spray bottle and spray the affected area, then leave for 30 minutes to allow it time to kill the growth.
For more established growth, use one cup of undiluted vinegar and apply it in the same way.
Hydrogen peroxide
Hydrogen peroxide is a powerful oxidizer, which when applied to mold, begins to break down its cell walls, effectively dissolving it. To use, mix one part hydrogen peroxide with ten parts water and pour it into a spray bottle. Allow the solution to sit on the affected area for at least twenty minutes before scrubbing the area with a soft-bristled brush to remove all residue.
Baking soda and vinegar solution
The effectiveness of vinegar can be amplified by adding baking soda to the solution. As vinegar is acidic and baking soda is alkaline, a process called neutralization occurs and releases carbon dioxide gas. This is the fizzing you see when you mix the two.
This fizzing action helps to break up the mold and loosen any deeply ingrained growth.
Mold killing products
There are plenty of mold-killing-specific products available in grocery stores and some specialist stores. These are often hydrogen-peroxide-based, but some of them may also contain powerful chemicals, so always ensure you read the information on the product to allow you to use it both effectively and safely.
Borax
Borax is a natural anti-fungal agent and has the ability to disrupt mold at a cellular level, preventing its growth and spread. It also absorbs moisture from the area it has been applied to, effectively dehydrating it. Whilst drying out mold will not kill it, it does prevent its spread and makes it easier to remove.
How to prevent mold on floor joists
Knowing how to kill and remove mold and fungi is certainly helpful, but being able to prevent its growth altogether is certainly preferable.
Fortunately, keeping your subfloor or crawl space joists free of fungal growth comes down to a few simple factors which include:
Ensuring adequate airflow
Modern homes are being affected more and more by high humidity and condensation levels due to building regulations requiring them to be more energy efficient. Whilst this reduces bills and is certainly good for the environment, it heavily restricts airflow, trapping high moisture air within the property which then condenses on cooler surfaces.
To ensure no condensation occurs on joists in your crawl spaces or subfloor, provide adequate ventilation by placing passive vents through your property and making use of kitchen and bathroom extractor fans.
It is certainly worth consulting a professional when adding passive vents to your property to make sure they are being placed in the most effective places.
Keeping humidity levels lower than 55%
Mold only requires humidity levels greater than 55% in order to thrive. This is the level at which moisture can begin condensing on cooler surfaces and can become a source of moisture for fungi to live off.
Once again, ensuring adequate airflow will assist in keeping moisture levels down, as well as inspecting your property for any broken pipes, damaged guttering, or any other sources of water ingress.
Properly insulate
Proper insulation prevents condensation buildup by regulating temperature and limiting the ingress of moisture from exterior walls. It also has the ability to regulate airflow if installed correctly.
Dry areas affected by water damage
If water is not quickly dried after flooding, moisture can soak into brick, timber, carpets, and many other materials. Over time this water will evaporate and be released into the air, creating a high humidity environment that will allow mold and mildew to grow.
After flooding, make use of dehumidifiers, heaters, fans, and any other method of airflow to ensure all residual moisture is removed as quickly as possible. Remove water-logged materials and replace them if necessary.
Use waterproofing and sealants
The use of waterproofing and sealants will assist in keeping moisture away from materials such as timber, creating an uninviting environment for fungal growth.
Damp-proof coursing should be frequently inspected in areas that are subject to frequent flooding, for the first few years in new-build properties and annually in older properties for any sign of wear and tear or perishing. Damage to damp-proof coursing (DPC) can slowly allow moisture through building materials which adds to overall moisture levels.
When to call a professional
Throughout this article, we have stated that superficial mold growth on subfloor or crawl space joists can often be remediated by homeowners. However, if the growth is extensive, or has been allowed to grow for an extended period, you may need to hire a professional to resolve the situation.
Professionals will be able to not only remove the growth but also investigate its cause, assess damage, and make suggestions as to how best to fix the issues discovered.
Conclusion
Mold on floor joists is common when high-humidity environments are mixed with warm temperatures and a lack of airflow such as within crawl spaces and subfloors.
Superficial growth can be removed by property owners by using cleaning agents such as vinegar or hydrogen peroxide, whereas extensive growth is better assessed and removed by a professional.
